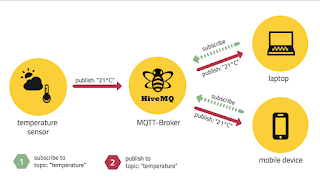
In previous post,
we have used https://www.pubnub.com as a Broker for Publish -Subscribe IoT Architecture.
Now we will be use Raspberry Pi 3 as a broker.
For Publish-Subscribe IoT Architecture, we need :
- Client (Publisher and Subscriber)
- Broker (Server)
Recommended Internet of Things (IOT) Courses:
- Udemy: Complete Guide to Build IOT Things from Scratch to Market
- LinkedIn: IoT Foundations: Fundamentals
- edX: Introduction to the Internet of Things (IoT)
- edureka: IoT Certification Training on Azure
- Coursera: An Introduction to Programming the Internet of Things (IOT) Specialization
- Eduonix: Internet Of Things (IOT) Bundle
MQTT (MQ Telemetry Transport) is one of the widely used protocol for Publish-Subscribe IoT Architecture.
In order to use Raspberry Pi 3 as Broker (Server), we need to install (MQTT) moquitto server
and To use Raspberry Pi 3 as client (Publisher or Subscriber), we need to istall (MQTT) mosquitto client on RPi3.
Follow these steps sequentially, to Install (MQTT) moquitto server and client on RPi3 (Raspbian Stretch OS):
STEPS:
1. Installing MQTT Broker on Raspberry Pi:
- Open terminal on RPi3 and Run following commands sequentially:
#1. To change directory to home directory
#2. To Download/Fetch the the mosquitto repository key (file)
#3. Set this key
#4. Change directory to below path
#5. To Download/Fetch mosquitto strech list
#6. To update all
#7. To change directory to home directory
#8. To Dwonload/Fetch openssl
Note: If you get any "404 not found" error in wget command, then put the link given in the command in the browser and check for the updated/latest version for the same package and use that (update) link in wget command.
Note: If you get any "404 not found" error in wget command, then put the link given in the command in the browser and check for the updated/latest version for the same package and use that (update) link in wget command.
#9. To install downloaded bebian package
#10. To Download/Fetch web socket library
Note: If you get any "404 not found" error in wget command, then put the link given in the command in the browser and check for the updated/latest version for the same package and use that (update) link in wget command.
Note: If you get any "404 not found" error in wget command, then put the link given in the command in the browser and check for the updated/latest version for the same package and use that (update) link in wget command.
#11. To install downloaded debian package
#12. To install mosquito
#13. To install mosquitto clients
For better understanding, watch the video below:
Demonstration:
2. Test installed mosquitto (MQTT broker):
#1. Start mosquitto (MQTT broker) as a service
#Expected Response:
#Expected Response:
#2. Start Subscriber for topic_name "iot"
Note: -d : debug mode, -t : topic_name
#Expected Response:
Note: -d : debug mode, -t : topic_name
#Expected Response:
#3. Start Publisher for topic_name "iot" and send message:
#Open new terminal window (keep previous terminal window open):
Note: -d : debug mode, -t : topic_name
#Expected Response: (On Publisher Window)
#Expected Response: (On Subscriber Window)
#Open new terminal window (keep previous terminal window open):
Note: -d : debug mode, -t : topic_name
#Expected Response: (On Publisher Window)
#Expected Response: (On Subscriber Window)
Here, Message we published using PUBLISHER is received by SUBSCRIBER.
That means, Testing of the mosquitto MQTT broker completed Successfully.
3. Installing mosquitto MQTT Client on Computer:
#1. To install mosquitto MQTT client on laptop (Windows / Mac / Linux etc):
For MacBook:Open terminal on macOS and paste these commands sequentially:
For MacBook:Open terminal on macOS and paste these commands sequentially:
For Others: To install mosquitto MQTT client on laptop (Windows / Linux , etc)Visit here: https://mosquitto.org/download/
#2. Start Subscriber for topic_name "iot" and to connect to MQTT Broker (RPi3):
For Macbook:
Note:
-h : host = <ip_address_of_RPi3>
-t : topic name
For Macbook:
Note:
-h : host = <ip_address_of_RPi3>
-t : topic name
Now whatever message is sent to the RPi3 (MQTT Broker) with topic name "iot" by any publisher will be received by your computer (MQTT Subscriber)
4. Stop the MQTT Broker on Raspberry Pi:
#1. Stop mosquitto (MQTT broker) service
#Expected Response:
#Expected Response:
--------------------------------------------------------------------------------
Click here to see more codes for Raspberry Pi 3 and similar Family.
Click here to see more codes for Raspberry Pi 3 and similar Family.
&
Click here to see more codes for NodeMCU ESP8266 and similar Family.
&
Click here to see more codes for Arduino Mega (ATMega 2560) and similar Family.
Click here to see more codes for NodeMCU ESP8266 and similar Family.
&
Click here to see more codes for Arduino Mega (ATMega 2560) and similar Family.
Feel free to ask doubts in the comment section. I will try my best to solve it.
If you find this helpful by any mean like, comment and share the post.
This is the simplest way to encourage me to keep doing such work.
Thanks and Regards,
-Akshay P. Daga


follow the below steps --
ردحذفa) restart pi
b) sudo apt-get upgrade
c) sudo apt --fix-broken install
d) Then install mosquito by going to #12 and #13
e) use ‘mosquitto --version’ to check mqtt version
note: ignore errors such –“ N: Ignoring file 'mosquitto-stretch.list.1' in directory '/etc/apt/sources.list.d/' as it has an invalid filename extension”
best tutorial I've seen!
ردحذفThank you very much.
حذفPlease checkout other Free IOT tutorials here : https://www.apdaga.com/search/label/IoT%20%28Internet%20of%20Things%29
This comment has been removed by a blog administrator.
ردحذف@Zaved khan what is the point of sharing movies related link here. Please stop spamming.
حذفThis comment has been removed by a blog administrator.
ردحذفThanks for your help, finally got it to work.
ردحذفThanks 😀
حذف