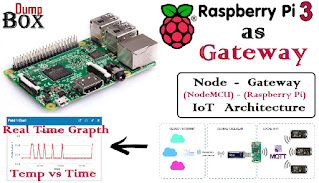
In Previous post, we have seen how we can initialize CGI server on Raspberry Pi 3 and use it as a Gateway for Node-Gateway IoT Architecture.
Here, I will demonstrate, how we can send live temperature data to ThinkSpeak server using Node-Gateway IoT architecture and observe the real-time Temperature vs Time graph on https://thinkspeak.com
Recommended Internet of Things (IOT) Courses:
- Udemy: Complete Guide to Build IOT Things from Scratch to Market
- LinkedIn: IoT Foundations: Fundamentals
- edX: Introduction to the Internet of Things (IoT)
- edureka: IoT Certification Training on Azure
- Coursera: An Introduction to Programming the Internet of Things (IOT) Specialization
- Eduonix: Internet Of Things (IOT) Bundle
NodeMCU (ESP8266) will be used as Node and RPi3 will be used as Gateway.
Description:
In this program,Analog Temperature sensor (LM35) is connected to the NodeMCU 1.0 (ESP-12E Module) (ESP8266MOD) board and Its output will be sent to Gateway (Raspberry Pi 3).
- A C-Program (NodeMCU_to_RPi3_Temp-APDaga.ino) is written and uploaded on NodeMCU ESP8266, which will collect real-time room temperature using LM35 Sensor. and will then send that temperature data to RPi3 (Gateway).
- In order to send the data to RPi3 (Gateway), Above mentioned C-Program will trigger a python script "ts.py" kept in /cgi-bin/ folder on RPi3 using CGI Server
- This "ts.py" script, will log the received temperature data into a text file "TS_Out.txt" and then send the same data to thinkspeak server where we can see the graph between temperature vs time.
NOTE:
1. Internal 10 bit ADC (A0) is used to read the Analog output of the Temperature Sensor.2. Temperature data shown on thinkspeak server grapth will be subset of Logged temperature data in text file on RPi3.
(Because free version of thinkspeak server accept data with the gap of 16 sec interval)
Steps to configure Arduino IDE to connect to NodeMCU ESP8266 are given Here.
Physical Connections:
Steps for Execution:
For Better understanding you can watch demonstration video given below:
Downloads:
Download link is given in the Description of the YouTube video shown below.
Demonstration:
NodeMCU_to_RPi3_Temp-APDaga.ino: (To be uploaded on NodeMCU)
/**************************
*CHANGE FOLLOWING THINGS:
* ip of RPi3
* ssid
* password
* path for ts.py python script (if needed)
**************************/

#include <ESP8266WiFi.h>

const char* host = "192.168.0.35";            // ip of RPi3
//String ApiKey = "FHLRDWDK7GXTF83S";         // Not needed
String path = "/cgi-bin/ts.py?field1=";       // ts.py is the name of python script running on RPi3

const char* ssid = "SuiteUp";                 // ssid_name
const char* pass = "welcome@10";              // password

int sensor = A0;                              // LM35 Analog Output

float tempc;
float svoltage;

void setup(void){                             // Function to Connect to Wi-Fi
  Serial.begin(115200);
  Serial.println("");

  WiFi.begin(ssid, pass);

  // Wait for connection
  while (WiFi.status() != WL_CONNECTED) {
    delay(100);
    Serial.print(".");
  }

  Serial.println("");
  Serial.print("Connected to ");
  Serial.println(ssid);
  Serial.print("IP address: ");
  Serial.println(WiFi.localIP());
}

void loop() {
  float xval = analogRead(sensor);    // Read Analog output from LM35 Temperature Sensor
  svoltage = (xval*3100.0)/1023;      // value in mili volt
  tempc = svoltage/10;                // value in degree celcius

  Serial.println(tempc);              // display on serial monitor

  WiFiClient client;

  const int httpPort = 8000;
  if (!client.connect(host, httpPort)) {    // connect to RPi3 CGI server with port no. 8000
    Serial.println("connection failed");
    return;
  }

  // send temperature data to RPi3 CGI server
  client.print(String("GET ") + path + String(tempc) + " HTTP/1.1\r\n" +
               "Host: " + host + "\r\n" +
               "Connection: keep-alive\r\n\r\n");

  // Format of the string for temp=25.4 is:
  // GET /cgi-bin/ts.py?field1=25.4 HTTP/1.1\r\nHost: 192.168.0.35\r\nConnection: keep-alive\r\n\r\n

  delay(10000);                            // wait for 1 sec
}
ts.py: (To be kept in /cgi-bin/ on RPi3)
#!/usr/bin/env python

##########################
#CHANGE FOLLOWING THINGS:
# api_key (from step 3)
##########################

# importing libraries
import cgi
import httplib, urllib
import time

sleep = 20

api_key = '7O4GGQFQGGPLYGF5'    # Thinkspeak API_key

def thermometer(val):           # Function to send data to thinkspeak server using API
    temp = val
    params = urllib.urlencode({'field1': temp, 'key':api_key })                                 # set parameter for post/update request of thinkspeak server
    headers = {"Content-type": "application/x-www-form-urlencoded","Accept": "text/plain"}      # set header for post/update request of thinkspeak server

 conn = httplib.HTTPConnection("api.thingspeak.com:80")      # connect to thinkspeak server

 try:
        conn.request("POST", "/update", params, headers)        # Send post / update request to Thinkspeak server
        response = conn.getresponse()                           # read response from thinkspeak server
        print temp                                              # print temperature
        print response.status, response.reason                  # print response from thinkspeak server
        data = response.read()
        conn.close()                                            # close connection

    except:
        print "connection failed"                               # print error
        #break

if __name__ == "__main__":          # main function start here
    # while True:
    form = cgi.FieldStorage()       # received form from Arduino

    val = form.getvalue('field1')   # Temp data from Arduino

    f=open("TS_Out.txt",'a')        # Open file in append mode
    f.write(str(val)+' \n')         # write temperature data in the file
    f.flush()                       # copy from buffer to file
    f.close()                       # Close file

    thermometer(val)                # Function to send data to thinkspeak server using API

    # time.sleep(sleep)             # wait for desired amount of time
Click here to see more codes for Raspberry Pi 3 and similar Family.
&
Click here to see more codes for NodeMCU ESP8266 and similar Family.
&
Click here to see more codes for Arduino Mega (ATMega 2560) and similar Family.
Click here to see more codes for NodeMCU ESP8266 and similar Family.
&
Click here to see more codes for Arduino Mega (ATMega 2560) and similar Family.
Feel free to ask doubts in the comment section. I will try my best to solve it.
If you find this helpful by any mean like, comment and share the post.
This is the simplest way to encourage me to keep doing such work.
Thanks and Regards,
-Akshay P. Daga


Is this wifi communication between R-pi and ESP based on MQTT protocol?
ReplyDeleteThis is HTTP communication. But you can find MQTT protocol in next blogs. Use Top-Right search bar.
Delete